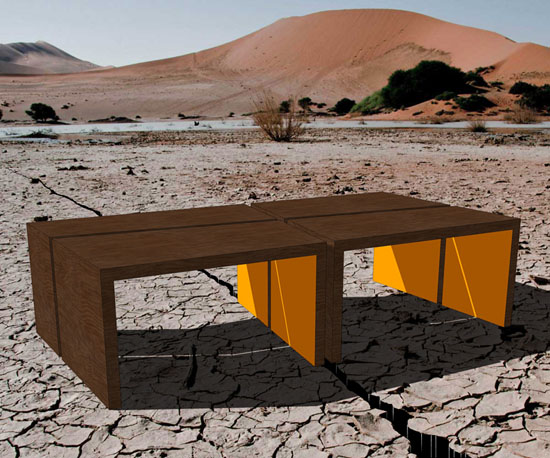
I wrapped up Design Development on the Seismic/Coffee\Table and through discussions with the clients ended up modifying the wood coffee table design just a bit to suit the clients’ needs. The previous post “Modern Coffee Table” examined my design origins and presented two options – one in aluminum and the other in wood. You can see that the final design (below) is strikingly similar to both if they were blended.

The white ghosted graphics show a plan and elevation sketch of the table. With a walnut veneer selected as the stained wood I procured materials and began building. The following images show my fabrication sequencing with a few notes.
Important! Disclaimer time – I’ve been woodworking for years and understand how to use my power tools. If you are going to do any woodworking yourself, read and follow all manufacturer directions and safety information. Even if you follow all directions there is still a chance of injury to yourself or others – please be careful.
Now that that’s out of the way, lets get to the shop!

1 Preparing to break down the 4′ x 8′ sheet goods into smaller pieces, so I can work the smaller pieces safely on my tablesaw.

2 Cutting the sets of leg panels to size. They will eventually be glued up into a 3-layer sandwich for each individual leg.

3 Leg panel glue-ups. Note you can never have enough clamps! You can see the sheet of walnut in the background which will become the tops.

4 Laying out the cuts on the top pieces. The angles are specifically laid out in my cut diagrams, and I transferred the lines onto the panel using some basic trigonometry…and a few simple checks in my design software. Measure twice, cut once.

5 Showing how I cut a 5-degree angle template with my circular saw. The MDF board at right is clamped down as a guide at a 5-degree angle relative to the work piece.

6 The cut sub-tops laid out before adding the leg panels. You can get a general idea of the final shape.

7 Setting up the bevel cuts on each side of the leg panels. I scribe a cut-to line on each leg so it smoothly aligns with the top before assembly. The sub-tops ride in a rabbet formed by the leg panels’ differing lengths (see the panel step-up in the upper right corner of the image).
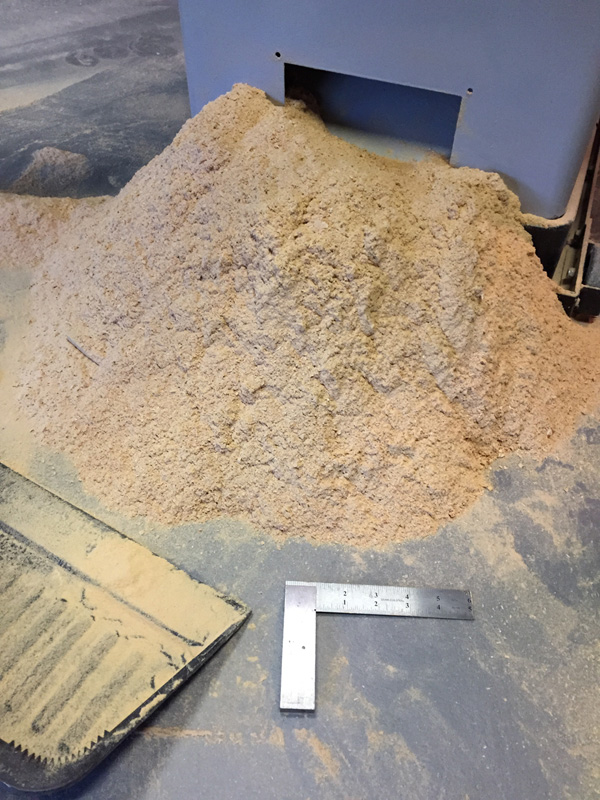
8 End of fabrication for today. I thought I’d snap a photo of the saw dust I cleaned out of my tablesaw. The metal angle is 6″ long for reference. It is amazing how much material is cut away by a blade that is 1/8″ thick. All the cuts add up to lost/wasted dust. And yes, I do recommend wearing a dust mask and hearing protection while using tools.
Stay tuned for Part 3 of the Seismic/Coffee\Table series where I’ll wrap up fabrication and finish the piece.
____________________________
This post was originally written before re-branding as Eckxstudio for Modern Architecture at the end of 2017.
At Eckxstudio for Modern Architecture, we design unique and stunning projects, individually crafted for our clients’ lives. We’re passionate about listening to your needs, wants and desires as inspiration to design the dream home you’ll never want to leave.
![]()


Leave A Comment